
Basically, this is my blog where I mainly post artwork I make in college to show to the world!
Sunday, January 9, 2011

Friday, December 17, 2010
Relief Painting
After messing around with masking tape, and tissue making this picture:
 I was advised by my tutors to make a larger one, using wood glue or PVA glue along with tissue to create a relief painting. I got lots of PVA down in the storage room and proceeded:
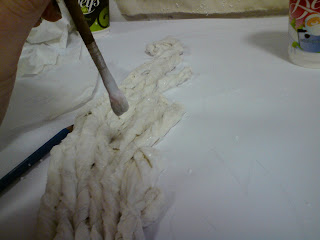

It's not perfect, but you get the idea!


Almost a gallon of PVA glue, a reem of (clean may I add) toilet paper and tubes of white and blue paint later, I finished my relief painting!

Wednesday, December 15, 2010
Stencil prints
Basically, I drew out a simple outline of my famous bridge onto plain card and cut out the black shape, and using this a template printed it rapidly onto plain cotton with acrylic paint and a sponge.


I attempted to dye some of the cotton blue, with well-watered down blue acrylic paint, and printed the same bridge in white paint on it.


I also tried making a 2nd one with a different picture and ultramarine paint.


Wednesday, December 8, 2010
Little bit of research
So I'm interested in paper art, and sculptures, I decided to do a bit of research on some other artists along that line. Pamela let me borrow a book and told me about Matt Shlian and Yuko Nishimura, which are amazing sculptors! Their works are out-of-this-world amazing!
(mattshlian.blogspot.com and http://yukonishimura.com/works-en.php)
 by Matt Shlian
I also came across this artist called Chris Burden who makes models of bridges out of meccano!
(mattshlian.blogspot.com and http://yukonishimura.com/works-en.php)
by Matt ShlianI also came across this artist called Chris Burden who makes models of bridges out of meccano!
Sunday, December 5, 2010
In the middle of making a bridge
After a tutorial with Giordana last Monday, I was strongly advised to make more 3D work. So, I found a large sheet of polystyrene in studio 2, and kind of borrowed it.
Using a stanley knife I cut out little bricks out of the polystyrene.


Using a stanley knife I cut out little bricks out of the polystyrene.


Then I borrowed a glue gun from the storage room and glued the bits together to make the front of the bridge.


That's how far I've got with that bridge so far
Tuesday, November 23, 2010
Hope you have your 3D glasses ready 8-)
I tried my hand at making a 3D picture. I looked up a step-to-step guide on http://graphicssoft.about.com/cs/photoshop/ht/3danaglyph.htm and spent all evening messing around with it on photoshop. I will probably get a bit better with more practice though.
Enjoy!

Enjoy!

Monday, November 15, 2010
Examples of modern bridge design
I was googling modern architecture and bridges and this page has a lot of information and examples on it. http://www.corusconstruction.com/en/reference/teaching_resources/architectural_studio_reference/design/bridges/examples_of_modern_bridge_design/
For example this bridge in Manchester is really striking and interesting, and I also found has roughly the same metal structure, painted white like the Sylvester O' Halloran bridge I came across in Limerick.
For example this bridge in Manchester is really striking and interesting, and I also found has roughly the same metal structure, painted white like the Sylvester O' Halloran bridge I came across in Limerick.
Thursday, November 11, 2010
Print, Print, Print
I quite enjoy making woodcut prints so I tried to make one of the bridge lately. I took this photo -
 Then mirror imaged it, and drew that image on a sheet of MDF, and shaded in all the areas I'm going to keep black. Using lino cutting tools, cut out all the white areas on the MDF.
The fun bit comes when inking the board, carefully with a roller and oil based ink, then carefully laying it down on the printing machine. Finally, I had to lay a sheet of paper, carefully on top of the print and lay a soft blanket over it, before compressing it through the print machine. Et voila:


The fun bit comes when inking the board, carefully with a roller and oil based ink, then carefully laying it down on the printing machine. Finally, I had to lay a sheet of paper, carefully on top of the print and lay a soft blanket over it, before compressing it through the print machine. Et voila:

I'm sure I had a better photo of it that that..
3D attempts...
Well, I tried to recreate this bridge...

with thin white card... and got this far...

So then I put it to one side and this week started making the structure with wire

Credit to http://www.limerickslife.com/citybridges.htm for the top photo. I took lots myself but didn't come out as good as it.
with thin white card... and got this far...

So then I put it to one side and this week started making the structure with wire

Credit to http://www.limerickslife.com/citybridges.htm for the top photo. I took lots myself but didn't come out as good as it.
Monday, November 1, 2010
Sorry I haven't uploaded anything lately
Well so far I've decided to stick with the fancy bridge that leads into the potato market in Limerick city. I've drawn a few sketches, made half a bridge out of mounting card (It didn't hold) and at the moment I'm chancing my arm at a woodcut print of it!
The pictures won't upload for some unknown reason.. I've tried a few times with no success! I'll upload them in the next post I guess.
The pictures won't upload for some unknown reason.. I've tried a few times with no success! I'll upload them in the next post I guess.
Subscribe to:
Posts (Atom)